


In this post, you will learn how to sew DIY long sleeve tie front peplum blouse with free sewing pattern.
Welcome to the world of DIY fashion, where creating a stunning tie front blouse is made simple! Inspired by the chic Ganni tie front blouse, this tutorial is perfect for sewing enthusiasts looking to add a touch of elegance to their wardrobe. Whether you’re a seasoned seamstress or picking up a needle for the first time, my easy-to-follow guide, complete with a free sewing pattern available in nine sizes for my subscribers , ensures that everyone can join in the fun. Get ready to craft a beautiful long sleeve peplum blouse with delightful front ties that transform into charming bows.


Step-by-Step Guide: How to Download My Free Patterns for Subscribers
What is Tie Front Blouse

A tie front blouse is a chic and versatile garment that features several ties at the front, which can be fashioned into elegant bows. This design element not only adds a touch of femininity and sophistication to the blouse but also allows for a customizable fit. The ties typically fall gracefully along the front, creating a focal point that draws the eye and enhances the overall aesthetic of the blouse. Whether made from silky fabrics for a luxurious feel or from more casual materials for everyday wear, tie front blouses with bow details are a delightful expression of personal style and can be paired with various bottoms to suit any occasion. With their unique blend of comfort and style, these blouses are a must-have in any fashion-forward wardrobe.
Materials & Tools Needed:
To sew a tie front blouse, especially one with multiple ties that form bows, you’ll need the following materials and tools:

Materials:
- Fabric: Choose a fabric that complements the style of the blouse.
- Fusible Interfacing: This is used to stabilize areas like the collar, and front placket where the ties will be attached.
- Matching Thread: Essential for sewing and ensuring that the stitches blend seamlessly with the fabric. Learn more on threads.
Tools:
- Scissors: For cutting fabric and patterns. Choose best scissors for this project.
- Seam ripper, learn how to use it here.
- Iron and ironboard
- A French curve ruler. Grab my french curved rulers for free here.
- L ruler or Measuring Tape: To measure and ensure that the pieces are the correct size.
- Pins or Sewing Clips: To hold the fabric pieces together before sewing.
- Sewing Machine: The primary tool for stitching the pieces together.
- Serger (optional): For a professional finish on the seams.

You will also need a magnetic seam guide or a magnet to help you sew evenly.
These materials and tools are needed to ensure that the blouse is constructed properly and that the ties can be created and attached securely, resulting in a beautiful and wearable final product.

Suggested Fabric for Tie Front Blouse
For your tie front blouse sewing project, the best fabrics would be those that are lightweight, breathable, and have a good drape to complement the style of the blouse. Here are some excellent fabric choices:
- Cotton Voile: A lightweight, semi-sheer fabric with a great drape, perfect for a breezy look.
- Cotton Lawn: Similar to voile but slightly crisper, giving a neat finish to the blouse.
- Cotton Blend
- Silk: Offers a luxurious feel and a beautiful sheen, making it ideal for a more formal or elegant blouse.
- Linen: Provides a natural, breathable quality with a distinctive texture that can add character to the blouse.
These fabrics are recommended because they are soft, comfortable against the skin, and easy to work with, especially for beginners. They also hold the shape of the ties and bows well, ensuring your blouse looks as good as it feels.
This tie in the front blouse requires 78.74 inches by 55.12 inches (200 cm na 140 cm) of main fabric.

Learn more on non stretch fabrics and choose best for this project.
Measurements you Need to Choose the Best Size for you Pattern
Tools and materials you need for measuring yourself
- A measuring tape
- A notebook and a pencil
- A mirror
- A friend or a helper (optional, but recommended)
To choose the best size for your pattern, you need to measure :
- Bust measurement

Check out my detailed post on how to measure yourself .
Size Chart
According to your measurements, you can check the size chart to find the best size for you.

Draft Dream Pattern For Tie Front Blouse
If you’re interested in designing your own tie in the front blouse pattern and giving it a personal touch, then this tutorial is perfect for you! I’ve put together a video and a post that are beginner-friendly, guiding you through the process with simple steps and clever tricks. Give it a try and let your creativity shine!
Step by step pattern drafting video for beginners.

Free PDF Pattern For Tie Front Blouse
sewing pattern that’s completely free for my subscribers! It’s at the end of the post.
If you prefect basic straight sleeve visit this post with sewing tutorial and pattern.
Learn how to modify the basic sleeve pattern to achieve the ganni peplum blouse style in this detailed video tutorial.
How to Assemble Pattern

Printing and Assembling Instructions
Check out my detailed posts on how to print, cut-out, and assemble PDF patterns.
How to print and assemble free PDF patterns
How to cut out sewing patterns with tips and tools

Seam Allowance
I suggest including an additional 1 cm | 0.4 in of seam allowance to the pattern pieces for this project. This extra allowance will provide ample space for sewing the seams without affecting the overall fit.
You may utilize a ruler or tape measure to indicate the seam allowance on the fabric. Another option is to use a seam gauge tool, specifically designed for measuring different seam allowances. Incorporating seam allowance is a crucial yet straightforward process in sewing. It guarantees that your garment will be the correct size and shape.
Learn more:
How to add seam allowance in sewing
How to Sew a Stylish Tie Front Blouse: A Step-by-Step Tutorial
Pattern Preparation:
- Begin by selecting a blouse pattern with balloon sleeves and a button placket. You can either use my free pattern or draft your own using basic bodice and sleeve blocks.
- Adjust the pattern according to your measurements and desired fit, and don’t forget to add seam allowances.
Cutting the Fabric:

- Lay out your pattern on the fabric and carefully cut out all the pieces.
- Follow the grainline markings to ensure your blouse hangs correctly. If you’re using delicate or slippery fabrics, consider cutting with weights or using pattern weights to hold the pattern in place.
Sewing Bust Darts:

- Fold the fabric along the dart legs, bringing them together towards the dart tip with right sides facing each other.
- Pin the dart in place perpendicular to the dart legs, away from the stitching line.
- Sew along the marked stitching line, tapering to a single point at the dart tip.
- Press the sewn dart flat for a professional finish.
Assembling the Blouse:

- Pin the front and back bodice pieces together at the shoulders and side seams, matching notches and seams accurately.
- Stitch the seams using a straight stitch or serger, and press them open or towards the back.
Adding the Button Placket:

- Draft a simple placket using interfacing if your pattern doesn’t include one.
- Fold and press the edges of the placket and stitch in place.
- Attach the button bands to the front bodice pieces, ensuring perfect alignment.
Sewing the Ruffle:

- Cut out a strip of fabric for your ruffle (1.5 to 2 times the length of the seam you’ll attach it to).
- Finish the edges of the ruffle strip to prevent fraying.
- Sew two rows of basting stitches along the top edge and gather the fabric.
- Attach the ruffle to the blouse, adjusting gathers evenly along the seam.
Sewing the Balloon Sleeves:
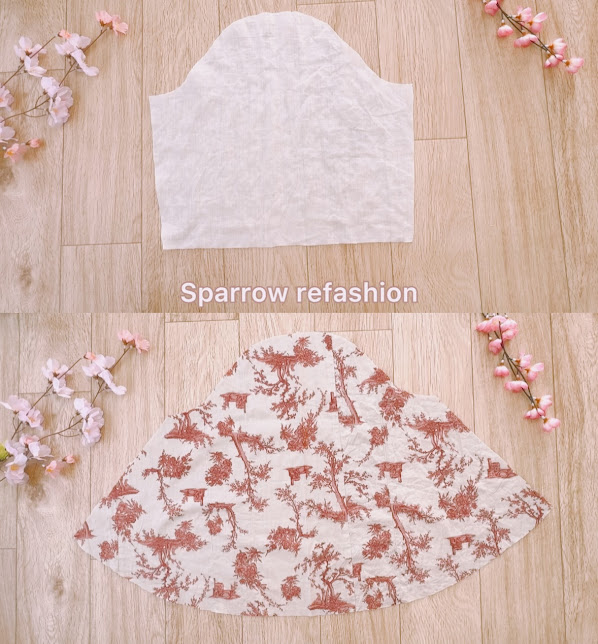
- Cut out sleeve pattern pieces from outer and lining fabric.
- Sew outer sleeve pieces along the curved edge, leaving the hem open. Repeat for lining sleeves.
- Slide the lining sleeve inside the outer sleeve, aligning raw edges.
- Sew around the armhole seam, trimming excess fabric and turning the sleeve right-side out.
- Attach sleeves to the body, following pattern instructions.

Finishing Touches:
Once the main construction is complete, finish your blouse by adding buttons or bow ties.
.heic)
Watch the Video Tutorial
If you want to discover the secrets behind creating this incredible peplum blouse, make sure to visit my YouTube channel and check out the video tutorial. I’ll guide you through each step of sewing a long sleeve peplum blouse and even provide you with some handy tips and tricks.
You can watch the video here.
Make sure to give a thumbs up, leave a comment, and hit that subscribe button on my channel to get more sewing tutorials. Don’t forget to share your results with me on Instagram or Facebook. I’m really excited to see what you come up with!

How to Wear Tie Front Blouse
Styling a tie front blouse offers endless possibilities. Here are some chic ways to wear it:
Casual Chic with Jeans:

Pair your tie front blouse with classic high-waisted jeans. Tuck the blouse into the jeans or knot it at the front for a relaxed vibe. Add ballet flats or ankle boots for a comfortable yet stylish look.
Ladylike Elegance:

Opt for a soft, silky tie front blouse in blush pink or light grey. Pair it with white skinny ankle jeans for a cozy and feminine ensemble. Ballet heels complete the ladylike feel.
Animal Print Statement:

Choose an animal print tie-front blouse as your hero piece. The leopard print adds subtle sexiness. Style it with mid-waist straight-leg jeans (which feel more like high-rise) for a flattering silhouette and add nice heels. Accessorize with fabulous jewelry, like layered necklaces and statement earrings.
Dressy Date Night:

Tuck your tie front blouse into a high-waisted skirt (think pleated or A-line) for an elegant look. Add heeled ankle boots or pumps and a clutch purse to elevate the outfit.
Holiday Party Glam:

Imagine pairing your blouse with wide black palazzo pants for a festive event and comfy sandal heels. The front ties detail adds a modern touch, and the leopard print keeps it edgy and chic.
Remember, the key is to play with different bottoms, accessories, and footwear to create versatile looks that suit your personal style!
Ready DIY Tie Front Peplum Blouse with Long Sleeve
Congratulations on completing your very own tie front blouse! With its puff sleeves and peplum design, you’ve just created a piece that’s not only fashionable but also uniquely yours. Don’t forget to check out the accompanying video tutorial for a visual walkthrough of the sewing process. Share your creation with me using the hashtag #sparrowrefashion and inspire others to embark on this rewarding sewing journey. Keep an eye out for more patterns and tutorials, and remember, with a little thread and creativity, the possibilities are endless!

In this post, you have learned how to sew DIY long sleeve tie front peplum blouse with free sewing pattern.
Free Bow Tie Blouse Sewing Pattern

Subscribe to continue reading
Subscribe to get access to the rest of this post and other subscriber-only content.

Comments are closed.